The best Cloud Calculator
Holori Cloud Calculator compares all cloud providers prices and helps you estimate cloud costs.
Introduction to Holori Cloud Calculator
Holori Cloud Calculator compares more than 50 000 compute offers. As of today the calculator benchmarks the cloud offers from AWS, GCP, Azure, Alibaba, Linode, Scaleway.
Visiting the cloud costs calculator of each provider takes forever, Holori Cloud Calculator centralizes all the data so that you can have access to the offers and prices on a single page. Unlike cloud providers’ cost calculator, you can easily find out which region is at the best price without requesting region by region.
With Holori Cloud Calculator you can specify your requirements and find the lowest cost estimate comparing various cloud providers for the configuration that suits you the most.
With Holori you can be confident to get the best pricing for your cloud usage and share it with your team or procurement.
How to compare compute instances? A step by step guide to save cloud costs.
Step 1: Go to Holori Cloud Calculator
The cloud cost calculator is available here: https://app.holori.com/compare
Out tip to quickly estimate your cloud costs is to save it as a bookmark to find it again easily.
Step 2: Select your purchase model
There are several purchase models depending on cloud providers. Smaller providers have simpler business models when larger ones can offer more complex options.
The standard purchase model for every provider is the on-demand rate that is usuallly priced per hour but can be projected on a monthly estimation.
Another popular purchase model is to purchase reserved instances where you have a one to three years commitment that however comes with interesting discounts.
We plan to have additionnal purchase models in our cloud estimator to take into account the specificities of each cloud provider.
One of them are Spot instances. Spot or preemtible instances are excess of capacity that providers sell at a very discounted price (up to 90% discount) making them very interesting to save costs. The price of these instances frequently evolves and needs to be updated on a frequent basis.
Another interesting purchase model to reduce cloud costs is the second-hand instance market. It’s only available for AWS at the moment.
Holori will integrate AWS Market Place API in order to be able to list the second-hand instances in our calculator.
To have an always up-to-date tool, the prices of Holori Cloud Calculator are regularly updated and new services are added.
Step 3: Select your currency
At the moment only USD is supported, other currencies will be supported soon with a daily update of the currency exchange rates.
Start saving with our Cloud Pricing Calculator.
Configure. Compare. Estimate.
Compare AWS vs Azure, AWS vs GCP, Azure vs GCP and get the most of your cloud providers.
Step 4: Select the location
By default the cost calculator displays prices from the cheapest to the most expensive without taking the location into account.
However, it can be needed to look for datacenters in specific areas/countries to comply with regulatory requirements or to benefit from a low latency by using a datacenter closer to you.
You can choose from the list to select your preferred location, the choices are sorted by continent/country/region/city.
The location is a key element of a compute cost and for the same instance there can up to 300% difference between the cheapest and most expensive.
In the cloud providers catalogs such as AWS calculator, GCP Calculator or Azure Calculator for example, you can’ t search the cheapest price among all locations but only for one location at a time. If you want to save cloud costs by using the cheapest region, this doesn’t make sense.
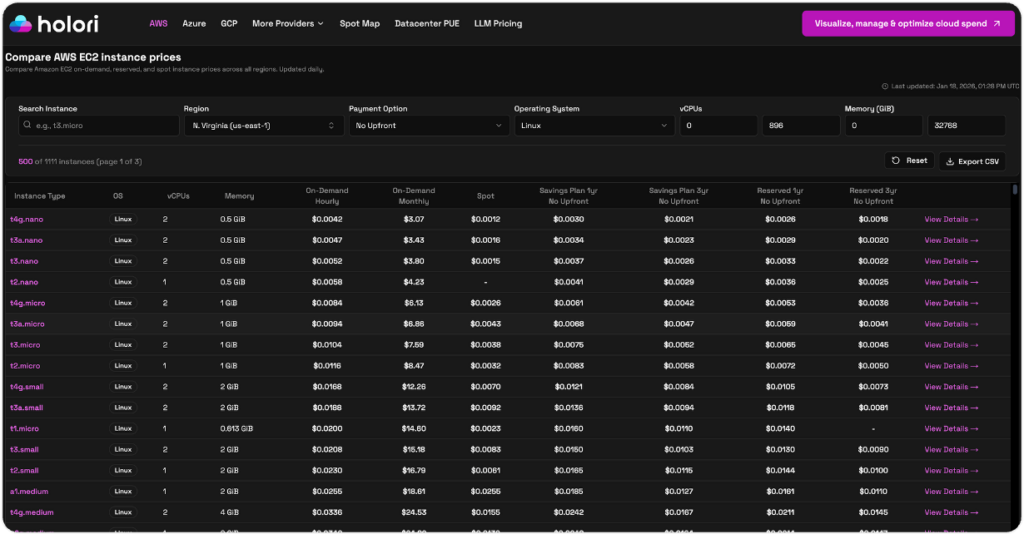
Step 5: Search for a specific Provider or instance name
If you are looking for a specifc instance name you can write it down and the cloud cost calculator will search for this very specific instance and sort the results by price depending on the location .
Step 6: Use tags
Several tags are available to refine the search results to more specific instances. As an example here are some of the tags we have: Intel, Nvidia, AMD, Baremetal…
Step 7: Select the tenancy type
There are two types of tenancy you can choose from, either dediacted or multi-tenant.
Dedicated means that the entire ressource is for your own usage and mutli-tenant means that it’s shared with others.
You can also choose from a baremetal server or a virtual machine.
Step 8: Select the CPU, RAM, Disk, GPU and the network speed and bandwith requirements
Define your requirements for your instance. You can configure a min and max for each variable.
We will display the results matching your requirements and sort them by price.